
Practicum Instructions for English 197 (Spring 2024)
Digital Humanities: Introduction to the Field
Practicum Assignment Instructions
Due various dates
30% of Final Grade
Course “practicums” are small-scale, hands-on exercises that ask students to experiment at a beginner’s level with the methods and tools of the digital humanities.
Reason for Assignment: The goal is not technical mastery but learning enough about the technologies to think about, and through, their concepts and also to discover which methods and tools might be used in a student’s future research. In many cases, experience gained in the practicums will contribute directly to the discussion of issues in class.
Outputs from Practicums: Outputs should be uploaded on Canvas as a post in the discussion board set up for each practicum. (Posts on the discussion board can include links or attachments–e.g., an attachment of a Word document containing explanatory text, tables, and screenshots.) Posts in these practicum discussion boards will be viewable by all members of the class.
Grading of Practicums: Practicums will be graded cumulatively instead of individually. At about the middle of the quarter, Prof. Liu will provide each student with an assessment of how they have been doing in their practicums so far (e.g., whether a student is doing A or B-level work). Then at the end of the quarter, Prof. Liu will give a cumulative grade for a student’s practicums. The grade will be based on the following criteria:
- Effort
- Creativity
- Quality of materials representing outputs from a practicum (including comments or reflections on an exercise when that is requested)
- Note: technical skill is not by itself a criterion for doing on the grade for the practicums. For example, it is possible to “fail” at getting a method or tool to “work” but still do well on a practicum based on effort, comments on what you learned even if you couldn’t complete the exercise, etc.
Google Books Ngram Viewer Exercise
Learn to use the Google Books Ngram Viewer, including at least a few of the “advanced features” explained on the “About Ngram Viewer” page. (See also “Google Books Ngram Viewer Cheat Sheet.”)

Then use the Ngram Viewer to explore some topic or issue of interest to you. You might also want to compare different date ranges and language corpora available in the dropdown lists at the top of the Ngram Viewer interface (e.g., American English versus British English).
Output ⇨ When you are done with the exercise, leave souvenirs of your experimentation in the form of screenshots or other material that you post to the Canvas discussion board for this practicum. Include in your post (or the document you attach to the post) a short comment (no more than 300 words total) that explains what you were trying to do, points out anything interesting that you observe, or comments on the method or tool used in the practicum.
- Note that you can make links to live Ngram Viewer graphs. (Here is an example of such a link.)
- You can also “embed” live Ngram Viewer graphs in your posts. To embed a live graph (like the one below), first in the Ngram Viewer interface click on the three dots at the top right and click on “Share.” Choose “Embed chart” and copy the code that appears. Then in your Canvas post, paste that code. (You need to be in source-code view in Canvas while editing your post, which you can turn on by clicking the icon </> at the bottom of the Canvas editing window.)
Text Encoding Exercise
(A) Simple HTML Exercise (with an added conceptually challenging problem)
Step 1 (hands-on exercise): Go to the W3Schools HTML Tutorial page and look quickly at the explanations in the first 7 lessons linked in the left sidebar (from “HTML Introduction” to “HTML Paragraphs”). Also selectively look at the explanations for other lessons of interest to you. Be sure to look as well at the explanation of “HTML CSS.” (Students already familiar with HTML and CSS can skip these explanations.)
Then on the W3schools HTML Tutorial page, click on the “Try it Yourself” button to open a two column interactive page where you can write HTML on the left, hit the “Run” button, and see the results rendered on the right.

On this W3Schools page, write HTML to create a simple web page with any content, images, and links you wish (subject, of course, to good taste and copyright laws). The page should include at least the following features:
- Text formatted in basic ways (as headers, bold, italics, etc.)
- Text in paragraph structures
- Text in lists
- Links
- A table
- An image (Note: sources for free images you can use without copyright permission constraints include: Wikimedia Commons and Unsplash.)
Also experiment with simple CSS (Cascading Style Sheets) to adjust the format/style of various elements on your test page. Students already familiar with HTML and CSS can conduct more advanced exercises if they wish.
Output A ⇨ When you are done, copy the HTML code and a screenshot of the rendered webpage (into an uploaded document) to a post in the Canvas discussion board for this practicum. (If you wish, you can also create a free account for yourself on the W3Schools site that will allow you to set up a “space” on their site where you can save code. (Click on the “Save” icon ![]() in the W3Schools interface to create an account and get started.) Once you have an account, clicking the “Save” icon will allow you to save your code.
in the W3Schools interface to create an account and get started.) Once you have an account, clicking the “Save” icon will allow you to save your code.
Step 2 (conceptual exercise): This is a purely conceptual exercise; you don’t actually have to do it (unless you are interested). Take a look at E. E. Cummings’ well-known poem “r-p-o-p-h-e-s-s-a-g-r” (1935). (If you are interested, you can read an analysis of the poem, also known as “Grasshopper,” here.) Think about what might be the best approach to encoding this in HTML; and be prepared to share your ideas in class discussion. (Note that multiple spaces entered in HTML code renders normally as a single space.)
(B) Imaginary TEI/XML Exercise
In this exercise, you will automatically generate a basic TEI XML encoding of a small passage of text — such as Lincoln’s Gettysburg Address (Bliss copy, 1864) — and then make up additional tags to encode something you think is important or of interest to you in the text.
- First download and save a small text file to your computer — e.g.,
lincoln-gettysburg-address-bliss-copy-1864.txt. (Save as a file with a “.txt” extension.) You may choose a different text to work with if you wish. - Go to the Text Encoding Initiative’s TEIGarage Conversion site, and follow this process:
- For “Convert from: ?”, click on “Documents”. Among the options for document formats, choose “Plain Text (.txt).”
- Then after a wait, you will see the prompt “Convert to: ?” appear to the right. Choose among the options “TEI P5 XML Document”.
- When the next set of prompts appear at the top of the screen, click on “Choose File” and select the Lincoln text file where you stored it on your computer.
- Then click on “Convert”, which will generate a TEI/XML encoded version of the Lincoln text and download it to you computer with the file extension
.xml. - Open this
.xmlfile in a text editor (such as Notepad, Notepad++, or TextEdit) so that you are prepared to copy and paste from it.
- Next go to the XML Viewer page on the Code Beautify site.
- Copy and paste the content of the Lincoln
.xmlfile you previously created into the “XML Input” column on the left. - Then click the button in the center of the page for “Beautify” to generate a nicely formatted version of the XML in the column at the right.
- Then copy-and-paste from the column on the right into a text editor like Notepad, Notepad++, or TextEdit, and save the file as a .xml file.
- Copy and paste the content of the Lincoln
- Now think about what you would like to encode in the beautified Lincoln
.xmlfile (or the .xml file for whatever text you chose) that seems important or interesting, and how to do it. Since this is an imaginary exercise, you do not need to study the TEI guidelines for actual tags designating elements, attributes, etc. (If you are interested, though, you can get a sense of what is possible by browsing the TEI by Example Tutorials, such as the one for encoding prose, including using <seg> tags with attributes you invent) Just make up your own tags. For example, you could make up a tag to use in the first sentence of Lincoln’s speech such as this one (a tag for the element “metaphor” that has attributes for “type” and whatever else you wish): “Four score and seven years ago <metaphor type=”genealogical” subtype=”patriarchal” motive=”call_for_authority”>our fathers</metaphor>….” Encode part or all of the text with one or two kinds of tags of this sort.- Note that tags must be closed units (with a begin-tag and an end-tag) and that tags cannot overlap. For example, this is not a legal tagging structure: <tag 1><tag 2></tag 1></tag 2>.
Output B ⇨ When you are done save the code of your revised .xml file in a document that you upload to the Canvas discussion board for this practicum (or you can copy the code into the same document you uploaded for the first part of this exercise). Include in your post (or the document you attach to the post) a short comment (no more than 300 words total) that explains what you were trying to do, points out anything interesting that you observe, or comments on the method or tool used in the practicum.
Text Analysis Exercise
What you will need for this exercise:
- Antconc program (download)
- A stopwords list (download the following stopwords list and save it as a plain-text “.txt” file on your computer: buckley-salton.txt)
- A long document or set of documents (up to several hundred documents if you wish) that you have access to as plain text files (stored as “.txt” files). [See suggestions for sources of texts below]
Instructions for this exercise:
- Download and install onto your computer the Antconc text-analysis program (available for Mac, Windows, Linux). The current version of the program is 4.x.
- Note for Mac Users: When you try to open AntConc, there may be a security message that says the app was prevented from opening. In order to get around this, you need to click the Apple icon, go to System Preferences, then Security & Privacy, and (if you haven’t already) change your preferences to Allow apps downloaded from “App Store and identified developers.” Even if these are your settings, the system will prevent AntConc from opening (it’s not an identified developer), but there will be a caption next to the radio buttons that says something along the lines of “AntConc was prevented from opening” and a button labeled “Open Anyway.” Click Open Anyway, and you shouldn’t have any issues running the application after that.
Note: If you have trouble getting AntConc to work (e.g., on a Mac) and cannot resolve the issues, then you may want to try a different well-known program that runs wholly through a browser online: Voyant Tools. On the Voyant Tools site, you can upload your own files for analysis. Or you can experiment with two corpora of demo text files (by Shakespeare or Austen). (Click “Open” on the home screen to access the demo files).

Screenshot of Voyant Tools Voyant Tools includes a whole suite of tools presented in a “dashboard” style, each of whose panes can be set for a different tool. Tools relevant to this practicum (analogous to those in AntConc) include “Corpus Terms,” “Corpus Collocates,” “Phrases,” etc. See the Voyant Tools Help page for guides to each tool.
 Configuration bar in each of Voyant Tools’s panes. Click on the icon that the cursor is pointing to here to open a menu of tools.
 - Find or create a plain-text (.txt) version of a long literary work or collection of works. Possible sources:
- Alan keeps a set of demo text corpora on his DH Toychest site here. These include, for example, a variety of ready-to-go text files (usually downloadable in .zip files) and links to online repositories of texts such as Project Gutenberg.
- Laurence Anthony the creator of AntConc, also has a utility tool called AntFileConverter for quickly converting PDF or Word files into plain-text .txt files. (Running the tool on an “input file(s)” will save the converted .txt file in a subfolder called “txt” of the folder in which the input file was located.)
- Study your chosen work(s) with Antconc. For example, look at results under the tabs for “Word” (word frequency list), “N-Gram” (frequeny of consecutive-word phrases), “Cluster” (similar to N-Gram,” but with the option to search for phrases with a word at the beginning or end) “Collocate” (words that co-occur within a defined number of words from each other), and “Keyword” (distinctiveness of particular words in a corpus by comparison with a “reference corpus” that you have optionally loaded in). Then take “souvenirs” of your explorations with Antconc (hopefully something interesting). For example, you can take souvenirs in the form of screenshots, exports of word lists into spreadsheets, etc. You can also use the following two options under Antconc’s “File” options to save data in text-file format (“Save Current Tab Restults”) or zipped .csv file format (“Save Current Tab DataTables”).

Output ⇨ When you are done with the exercise, leave souvenirs of your experimentation in the form of screenshots of Antconc, or text or other files (saved in Antconc when looking at results by using “File” –> “Save Current Tab Results”) that you post to the Canvas discussion board for this practicum. Include in your post (or the document you attach to the post) a short comment (no more than 300 words total) that explains what you were trying to do, points out anything interesting that you observe, or comments on the method or tool used in the practicum.
Help File & Tutorials for Antconc:
- The Help file for the latest version of Antconc can be found on the Antconc home page under “User Support’ > “Latest Help files”.( For example, the help file for Antconc version 4.2.4 is a PDF file here.)
- Video and other tutorials and guides are further down on the Antconc home page (scroll down).
Basic Instructions for Using Antconc:
(click on thumbnails below for larger screenshot images)
(Step 1) Choose text files to make into a “corpus” for your analysis. (You can select multiple files in a folder) (click on image below for larger instructions):

(Step 2) Apply a stopwords list (stoplist) to filter out common words like “the,” “of,” etc.:
- First download the following stopwords list and save it as a plain-text “txt” file on your computer: buckley-salton.txt
- Then in Antconc go to “Global Settings” and follow these steps:

Antconc 4.x – How to set a stopwords list (stoplist) file for words to ignore in an analysis.

(Optional step) You can load a “reference” (i.e., comparison) corpus so you can use Antconc’s “Keyword” function. This function analyzes the “keyness” or distinctiveness of words in the corpus you are studying by comparison with a reference corpus. Instructions:
- First, have available a reference comparison file, or multiple files on your computer (must be plain-text “txt” files)
- Then in AntConc, go to File > “Open Corpus Manager” and follow the instructions in the screenshot below:
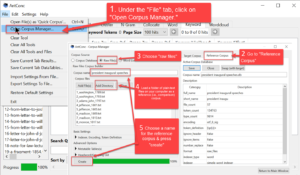
Antconc 4.x – Creating a “reference” (i.e., comparison) corpus to use for Antconc’s “Keyword” function, where “keyness” means how distinctive a word is by comparisin with the reference corpus.

(Final step) Now you can start exploring the document file(s) you chose for study using Antconc. The best way to start is to count all the words in the document(s. Choose the “Word” tab in Antconc, then follow the directions in the screenshot below:

Next, try out the “N-grams,” “clusters,” and “collocates” tabs, seleting a word (or words) to explore for phrases in which they occur (n-grams and clusters) or for words that often co-occur nearby but not necessarily adjacent or consecutively (collocates).
Topic Modeling Exercise
- Read through (and, if you wish, try) the lesson plan in Shawn Graham, Ian Milligan, Scott Weingart, “Topic Modeling By Hand” (from The Historian’s Macroscope).
- Experiment with the Topic Modeling Tool, which provides a simplified, GUI front-end for the underlying MALLET topic modeling tool. (See the Topic Modeling Tool’s page linked above for download and operation instructions. Under “Optional Settings” in the program you can load a stopword list. For example, download the following stopwords list and save it as a plain-text “.txt” file on your computer: buckley-salton.txt. Or you can find stopword lists in many languages here and here.)
[Optional, more ambitious exercise: download, install, and experiment with the actual MALLET topic-modeling tool, which runs from the command line. (See The Programming Historian Tutorial “Building a Topic Model with MALLET” for instructions on installing and running MALLET).]
An ideal experiment is to topic model a relatively small collection of texts (e.g., 10 to 100 documents you have extracted as plain text and put in a folder) or a “chunked” plain-text version of a long text (e.g., a novel with separate files for each chapter). If you wish, you can use any of the ready-to-go text collections in the “Demo Corpora” section of Alan’s DH Toychest.
- Using the Topic Modeling Tool on a text(s) of your choice, look for examples of topics (represented by the top-frequency words of each) that you:
- understand or would have predicted given the nature of your texts;
- half-understand (but has puzzling words in it)
- do not understand.
- Try your hand at labeling topics. (A good label is a word or short phrase, not a sentence that imposes a thesis.)
- Look at the topics and see what documents are heavily associated with them, and what other topics those documents are associated with.
- Using the Topic Modeling Tool on a text(s) of your choice, look for examples of topics (represented by the top-frequency words of each) that you:
Note: You may instead (or in addition) use the similar “Topics” tool implemented online in Voyant Tools. On the Voyant Tools site, you can upload your own files for analysis. Or you can experiment with two corpora of demo text files (by Shakespeare or Austen) of the text of Mary Shelley’s Frankenstein. (Click “Open” on the home screen to access the demo files).
Voyant Tools include a whole suite of tools presented in a “dashboard” style, each of whose panes can be set for a different tool. The tool relevant to this practicum is “Topics.” See the Voyant Tools Help page for guide to the tool. The interface for a topic model in Voyant Tools also has a “Toggle diagnostics” button that will show detailed statistics about a topic. (For an explanation of the statistics, see the MALLET FAQ here.)
|
Configuration bar in each of Voyant Tools’s panes. Click on the icon that the cursor is pointing to here to open a menu of tools.
|
|
|
Interface for the “Topics” tool in Voyant Tools, with the navigation path to the tool indicated (and also the “Toggle diagnostivcs” button shown).
|

Output ⇨ When you are done with the exercise, leave souvenirs of your experimentation in the form of screenshots, spreadsheets, or other material that you post to the Canvas discussion board for this practicum. Include in your post (or the document you attach to the post) a short comment (no more than 300 words total) that explains what you were trying to do, points out anything interesting that you observe, or comments on the method or tool used in the practicum.
Word Embedding Exercise
- Play with “Infinite Craft” by Neal Agarwal
(See parts of this YouTube video to learn how to play.) This game gives a quick, initial sense of some of the basic principles behind word embedding and ultimately “large language models.” (It actually runs on the basis of a large language model. See Wikipedia article on the game.)
- Try the Tensorflow Embedding Projector (by Google AI)
- Go to Tensorflow Embedding Projector.
- Try various experiments. For example, enter a word to explore (in the search field at the top right) and click on one of the related words that appears in the list labeled “Nearest points in the original space.” Then click on “Isolate 101 points” and observe the nearness/farness of words from other words. (See this tutorial for good instructions on using the tool’s interface to explore: Parul Pandey, “Visualizing Bias in Data Using Embedding Projector.” You cal also look at this Google AI blog post for an example of using the tool’s interface. Additionally, if you are interested, you can see this short paper, which inludes more detailed instructions for using th interface.)

Interface for Tensorflow Embedding Projector (Click on thumbnail for larger image to read descriptions of useful controls.)
- Optional: Try the Word Embedding Demo (by S. Bandyopadhyay et al.) — Concentrate on the 3-D visualization at the left, not the hard-to-understand visualation at the right. Also, not all parts of this demo work. (Basically, mess around!)
- Go to Word Embedding Demo. (Note: it takes a minute or two for the demo to load, during which you will see the message “downloading model…”)
- Open the “Experiments” link in a different tab. Try at least a few of the suggestions under “Basic Exploration,” “Analogies,” and “Semantic Dimensions.” P.S., If you are interested, the creators of this demo published a research article about it: Saptarashmi Bandyopadhyay et al., “Interactive Visualizations of Word Embeddings for K-12 Students” (2022).
- Optional: For fun, try the Semantris game from Google AI (in its “Arcade” or “Blocks” variants)! (Quick intro mentioning the word embedding / word vectors modeling underlying the game.)

Output ⇨ When you are done with the exercise, leave souvenirs of your experimentation in the form of screenshots or other material that you post to the Canvas discussion board for this practicum. Include in your post (or the document you attach to the post) a short comment (no more than 300 words total) that explains what you were trying to do, points out anything interesting that you observe, or comments on the method or tool used in the practicum.
Large Language Models & Text-to-Image Large Models Exercise
Large Language Models
- Read Alan Liu, “What Is Good Writing in the Age of ChatGPT?” (Commencement Address for the UCSB English Dept., 2023).
- Then use one or more LLM (large language model) of your choice in a way you can meaningfully claim is “creative”–whether the agency of creativity is you, the LLM, or the combination of the two. (This will involve trying experiments and also thinking about what “creativty” means in this context.)
- The following are some of the LLMs that you can try. Most include a free level of use, though some also include a paid higher level (or, in the case of some image generators, charge by the image). Some generate text; some generate images; and some can generate both text and images. For this assigment, you can choose to concentrate on either text or image generation, though it’s a good idea to try your hand at both.
- Text Generators (or multimodal text & image geneators):
- ChatGPT from OpenAI (free plan currently provides access to the GPT 3.5 text-generation LLM)
- ChatGPT Plus (subscription upgrade to the free plan that provides access to the GPT 4 LLM, and also works multimodally with DALL-E 3 to generate images) (Latest news: ChatGPT 4o released on May 13, 2024)
- Copilot from Microsoft (uses ChapGPT to provide multimodal text and image generation; image creation requires signing in to a Microsoft account)
- Copilot Pro (subscription upgrade whose features include integration of ChatGPT in Microsoft 365 productivity apps)
- Gemini from Google (multimodal text and image generator; previously called Bard)
- Claude 2 from Anthropic (text generator)
- Claude Pro (subscription upgrade)
- Llama 2 online from Meta (online version of Meta’s open-source LLM. See also this online interface, which allows users to customize settings.) (Llama 2 can also be downloaded by users for local use and customization.)
- ChatGPT from OpenAI (free plan currently provides access to the GPT 3.5 text-generation LLM)
- Text-to-Image Generators:
- Dall-E 2 and Dall-E 3 from OpenAI
- Stable AI from Stability AI (various image, audio, and video generator models) See also Stable Diffusion 2.1 demo site.
- Midjourney from Midjourney Inc. (paid plans for image generation; requires a Discord account to sign up).
- Text Generators (or multimodal text & image geneators):
- The following are some of the LLMs that you can try. Most include a free level of use, though some also include a paid higher level (or, in the case of some image generators, charge by the image). Some generate text; some generate images; and some can generate both text and images. For this assigment, you can choose to concentrate on either text or image generation, though it’s a good idea to try your hand at both.
- When you are done, deposit souvenirs and a short commentary in Canvas as usual (at the link below). For this asasignment, your commentary should explain why you think you and/or the LLM have been “creative.”
Output ⇨ When you are done with the exercise, leave souvenirs of your experimentation in the form of screenshots or other material that you post to the Canvas discussion board for this practicum. Include in your post (or the document you attach to the post) a short comment (no more than 300 words total) that explains what you were trying to do, points out anything interesting that you observe, or comments on the method or tool used in the practicum. For this asasignment, your commentary should explain why you think you and/or the LLM have been “creative.”
Social Network Analysis Exercise (Part A)
This is an optional practicum for those who have an “X” ( Twitter) account. (See below on getting started on the first step of Part B of the social network analysis exercise if you do not to do Part A.) Use one or both of the following online services to explore networks of words, hashtags, or users on “X” (Twitter). (Create a free account on these services; and then allow the association of the service with your “X”account, which will enable the services to use the “X” API for their searches.)
Output ⇨ When you are done with the exercise, leave souvenirs of your experimentation in the form of screenshots or other material that you post to the Canvas discussion board for this practicum. Include in your post (or the document you attach to the post) a short comment (no more than 300 words total) that explains what you were trying to do, points out anything interesting that you observe, or comments on the method or tool used in the practicum.
![]() If you do not do the Social Network Analysis Exercise (Part !), then by class 17 you should begin on the “manual” first step of the Part B exercise due in Class 18. (See below)
If you do not do the Social Network Analysis Exercise (Part !), then by class 17 you should begin on the “manual” first step of the Part B exercise due in Class 18. (See below)
Social Network Analysis Exercise (Part B)
- Manually create a small-scale social network analysis of a literary work (or section of a work) by deciding what nodes and edges you want to study. Read through the work and record the nodes and edges. (For instance: nodes = characters in a play; edges = characters who speak to each other. Example: in Hamlet, Act 1, Scene 1, you can identify characters as nodes and dialogue from one character to another as edges.)
- Enter the nodes and edges in a spreadsheet using Excel or Google Sheets formatted for use by the yED graphing program as in this example Excel sheet. (See more detailed instructions here.)
- (Note that for the yEd graphing program you need to create the Nodes and Edges tables on the same sheet in the spreadsheet, not separate sheets However, if you optionally choose to use the Gephi graphing program instead (mentioned below), the Nodes and Edges tables need to be created in separate sheets that you can import in .csv format into Gephi separately.
- Then use the yEd graphiing program (download here) to open and visualize the spreadsheet.
Optionally, you can use the Gephi social network analysis graphing program instead. Install Gephi on your computer. Then follow the below instructions first to take a tutorial and then to analyze your own Nodes and Edges:
Note: Gephi requires that Java be installed on your computer (see Gephi Requirements — “The current stable version of Gephi will only run with Java 11. Java is bundled with the application so it doesn’t have to be installed separately.”) Debugging the “Cannot locate java installation in specified jkdhom” Gephi error on Windows machines: If Gephi reports “Cannot locate java installation in specified jkdhom”, then do the following:
- Go into your program folder and find the folder location of the latest version of Java on your computer. For example, C:\Program Files (x86)\Java\jre1.8.0_311
- Then open the following Gephi configuration file in a text editor: “C:\Program Files\Gephi-0.9.2\etc\gephi.conf” and change the following line so that it goes to your current version of Java: “jdkhome=”C:\Program Files (x86)\Java\jre1.8.0_311″
Alternative if you cannot get Gephi to run: As an alternative to using Gephi, use John Ladd and Zoe LeBlanc’s Network Navigator — an online-only tool for visualizing networks from data (in the form of “edge” files representing node to node connections). You may in any case be interested in putting your data into Network Navigator in addition to visualizing it in Gephi (or as a preliminary to experimenting with Gephi).
- Work through the following tutorial: Adapted version of Par Martin Grandjean’s Gephi Tutorial of 2013 (adapted by A. Liu for Gephi 0.9.1).
Cheatsheets & other tutorials for Gephi:
- Gephi Cheatsheet
 (by Clement Levallois)
 - Gephi Basics
- Other Gephi tutorials (see in DH Toychest)
- (You may also be interested in an article explaining the frequently used “ForceAtlas2” layout option for Gephi visualizations. The article is technical, but gives a sense of what would be involved in unlocking the “black box” of concepts behind such algorithms: Mathieu Jacomy, et al. , “ForceAtlas2, a Continuous Graph Layout Algorithm for Handy Network Visualization Designed for the Gephi Software” [2014])
- Try to understand the logic/format of the two
.csvfiles used in Grandjean’s Gephi tutorial (one that identifies the “nodes” and the other the “edges,” or relations between nodes). Then choose a very limited work or works that would be of interest to humanities scholars (e.g., a chapter in a novel, a scene in a play or film, an hour of a Twitter timeline from a conference) and create your own nodes and edges.csvfiles (which can be created in a plain-text editor or exported from a spreadsheet or even a word processor). Use your.csvfiles in Gephi to create a visualization. (If you wish, you can create just a hypothetical set of nodes and edges “as if” you were analyzing something even though you don’t have time to do that for real at present.) (For other datasets of nodes and edges.csvfiles designed for use with Gephi, see Melanie Walsh’s “Sample Social Network Datasets For Teaching With Gephi (and Other Tools Like It).”) - You may also be interested in downloading, unzipping, and opening or importing in Gephi some of the other Gephi datasets available from Wiki.Gephi.org in a variety of formats (.gexf and .gml).
Output ⇨ When you are done with the exercise, leave souvenirs of your experimentation in the form of screenshots or other material that you post to the Canvas discussion board for this practicum. Include in your post (or the document you attach to the post) a short comment (no more than 300 words total) that explains what you were trying to do, points out anything interesting that you observe, or comments on the method or tool used in the practicum.